
Chapter 6 Building Digital Competence
Chapter Learning Objectives
By the end of this chapter, you will be able to:
- evaluate your personal digital competence using the DigCompEdu framework’s SELFIE tool.
- apply the six DigCompEdu pillars to audit and improve existing course design.
- design AI-enhanced learning experiences that integrate ethical safeguards.
- integrate TPACK principles with DigCompEdu to make informed technology decisions.
6.1 Introduction
Effective educators must strive to design online learning that is engaging, effective, and accessible. As we adapt to online learning environments and integrate AI tools, we must reshape how we plan, teach, assess, and support students’ digital competences. Educators’ digital competencies must shift from a helpful add-on to core professional practice. This chapter argues for developing educators’ digital competencies as the throughline that sustains quality, equity, and academic integrity in online learning. Building on earlier chapters that covered Backward Design and SMART objectives (Chapter 2), OSCQR and RSI (Chapter 3), inclusive course design and Universal Design for Learning (Chapter 4), and dynamic strategies for online engagement and assessment (Chapter 5) we extend from foundational course design principles to how we operate as digitally competent educators. Using the European Union’s DigCompEdu as our framework, we show you how to evaluate and integrate AI-enabled practices while maintaining pedagogical excellence.
6.2 DigCompEdu Framework
Rapid AI adoption, rising expectations for quality and regulatory compliance, and widening equity gaps make digital competence a core requirement of academic practice. DigCompEdu provides a shared language and progression model to develop that competence systematically, enabling you to design ethically sound AI-enhanced learning experiences, protect privacy and academic integrity, and ensure evidence of learning aligns with course outcomes. This framework also positions you to cultivate your students’ digital competencies, preparing them for the AI-integrated realities of contemporary work and study.
DigCompEdu, developed by the European Commission’s Joint Research Centre, is an educator-focused framework that supports digital competence across early childhood, K-12, Vocational Education and Training, higher education, adult, and non-formal learning contexts (Redecker, 2017). The framework organizes 22 competencies into six areas: Professional Engagement, Digital Resources, Teaching and Learning, Assessment, Empowering Learners, and Facilitating Learners’ Digital Competence. It includes a six-level progression from (A1) Newcomer to (C2) Pioneer to guide targeted development and provide evidence of impact.
Self-reflection tools, including Check-In for Higher Education and SELFIE for Teachers, help you profile your strengths and plan professional growth (European Commission, 2022). DigCompEdu is intentionally technology-agnostic and aligns with instructional design best practices including accessibility, copyright and OER principles, privacy, and data protection. This ensures that digital tools enhance learning rather than distract from pedagogical goals. The framework also complements the citizen-focused DigComp framework, the 2.2 update of which added extensive examples for data literacy and AI (Vuorikari et al., 2022).
6.2.1 Self-Assessment
To establish a baseline understanding of your current digital competencies, complete the free SELFIE for Teachers self-reflection tool, which provides a profile across the six DigCompEdu areas and an A1–C2 proficiency snapshot. The assessment takes approximately 20–25 minutes and generates a downloadable report with personalized suggestions for improvement. The SELFIE platform is freely accessible to educators worldwide and keeps all reports private unless you choose to share them.
For a quick orientation on what the tool does and how results are presented, watch this short overview.
SELFIEforTEACHERS (1:40 min)
For step-by-step guidance on interpreting your scores and planning growth, use the official SELFIEforTEACHERS Toolkit.
6.2.2 Pillars of Educators’ Digital Competence
The six DigCompEdu areas of Professional Engagement, Digital Resources, Teaching and Learning, Assessment, Empowering Learners, and Facilitating Learners’ Digital Competence provide a comprehensive structure for understanding educators’ digital competence in AI-integrated environments. This section explains the intent of each area and demonstrates how AI tools can be meaningfully integrated within each. For every area, we highlight AI applications that add genuine pedagogical value, examine essential safeguards that protect privacy and academic integrity, and identify design choices that advance accessibility and equity.
6.2.2.1 Professional Engagement
Professional Engagement in DigCompEdu concerns how educators use digital technologies to communicate, collaborate, reflect, and continue learning as professionals. It includes four competencies: organizational communication (1.1), professional collaboration (1.2), reflective practice (1.3), and digital continuous professional development (1.4). Clear, timely communication and collaborative routines create the conditions for wise resource selection, effective teaching and assessment, and equitable practice. Reflective use of feedback and data transforms everyday experience into improvement, while ongoing professional learning keeps practice responsive to changing contexts. DigCompEdu emphasizes that the goal is not tool fluency for its own sake, but the pedagogical use of technologies to enhance education.
Within this pillar, educators can use AI to draft and adapt messages for diverse audiences, synthesize meetings and research, monitor emerging scholarship, and identify course analytics patterns that inform reflection and next steps. These applications require careful safeguards: transparent communication about AI assistance, responsible handling of personal and student data, and preference for trustworthy sources in professional learning. Professional Engagement serves as the foundation for responsible AI use across the entire framework, establishing norms of privacy, integrity, accessibility, and evidence-informed practice before applying them to resources, teaching, assessment, and learner empowerment. Professional Engagement provides the routines that connect CPD to Chapter 2’s measurable goals, make Chapter 3’s RSI visible, and advance Chapter 4’s inclusive design.
6.2.2.2 Digital Resources
The Digital Resources pillar focuses on the choices educators make about learning materials and the responsibilities that accompany those decisions. This includes selecting and curating resources that serve course outcomes (2.1), creating or adapting materials for specific contexts and accessibility needs (2.2), and managing, protecting, and sharing materials responsibly (2.3). The emphasis is on fitness for purpose rather than volume. High-quality resources align with learning objectives, are available in multiple formats, remain accessible to diverse learners, and include clear information about authorship, licensing, and data use.
AI has become integral to resource development and management. Educators can leverage AI to discover and compare sources, generate initial drafts of explanations and visuals, translate or simplify texts for different proficiency levels, create transcripts and captions, and convert formats to meet accessibility requirements. However, these capabilities demand oversight: verify accuracy and identify potential bias, document source provenance, respect copyright and licensing requirements, and avoid exposing student or institutional data to external models. When adapting OER with AI assistance, maintain license information, attribute all modifications, and preserve version history so colleagues and students understand how resources evolved. When sharing materials, prioritize repositories and platforms that support accessible formats, provide stable links, and offer clear licensing information.
This pillar ties the framework together in practice. Thoughtful curation make teaching and assessment coherent, while sound management and protection uphold privacy, accessibility, and academic integrity. The Digital Resources pillar aligns with Chapter 2’s outcomes via resources that advance measurable objectives, operationalizes Chapter 3’s OSCQR and RSI expectations through timely, accessible materials, advances Chapter 4’s inclusive design by providing multiple means of representation and clear licensing, and supports Chapter 5’s engagement and assessment through well-scaffolded artifacts.
6.2.2.3 Teaching and Learning
The Teaching and Learning pillar describes how educators plan and conduct learning so students can engage purposefully, work with others, and build independence. It covers four competencies: teaching (3.1), guidance (3.2), collaborative learning (3.3), and self-regulated learning (3.4). In practice, this pillar connects Professional Engagement to Digital Resources. Reflective practice informs the sequencing of activities and the pacing of support. Curated materials become learning experiences when guidance is clear, collaboration is structured, and students are equipped to monitor their progress and adjust strategies.
Here, AI serves as a set of tools for design and facilitation, not as a substitute for pedagogy. For teaching and guidance, AI can help you draft activity prompts, vary examples by difficulty, and generate alternative explanations or translations to meet different needs. For collaborative learning, it can help you create groups, propose roles, and summarize discussions so that your students spend more time on sense-making. For self-regulated learning, AI can offer students study plans, metacognitive check-ins, and formative feedback that points them back to goals and criteria. These benefits carry responsibilities. Be transparent about when you utilize AI, keep data collection minimal, require human verification for content accuracy, and guard against over-scaffolding that reduces productive struggle. Use learning analytics as conversation starters with your students, not as final judgments.
Teaching and Learning realizes Chapter 2‘s aligned objectives in learning activities, makes Chapter 3‘s RSI visible through clear guidance and timely facilitation, and advances Chapter 4‘s UDL commitments by offering multiple paths, prompts, and supports without lowering expectations.
6.2.2.4 Assessment
In DigCompEdu, Assessment covers how we design assessment strategies (4.1), analyze evidence of learning (4.2), and provide feedback and plan next steps (4.3). This pillar sits in active dialogue with earlier pillars. Strategy connects to Teaching and Learning by aligning tasks, criteria, and support. Analyzing evidence depends on sound data management practices from Digital Resources. Feedback and planning rely on Professional Engagement for clear organizational communication and on Teaching and Learning guidance to help students act on feedback. The goal is coherent assessment that measures what matters, protects learners’ data, and fosters continuous improvement.
AI can strengthen this pillar when used thoughtfully. For strategy development, you can use AI to generate task prompts, create parallel assessment versions for different readiness levels, and surface misconceptions for formative checks. You can also verify accuracy and alignment with learning outcomes. For evidence analysis, analytics and AI-assisted summaries can help you find patterns in submissions or discussions. For feedback and planning, you can employ AI to draft individualized comments, translate or simplify feedback, and direct students to relevant resources.
Equally important is setting clear expectations for student use of AI. Provide explicit guidance on permitted or prohibited uses, require disclosure statements where you do allow AI use, and design rubrics that reward evidence of learning processes such as version history, outlines, draft-to-final comparisons, complete citations of sources and AI assistance, and reflective checks that authenticate authorship. Where you prohibit AI use, articulate rubric criteria that make expected human work visible, such as original analysis tied to course materials, documented drafting processes, and targeted application to local contexts.
Assessment makes Chapter 3‘s RSI concrete through timely, substantive feedback. It aligns with Chapter 2 by ensuring that evidence maps to outcomes and SMART learning objectives and extends Chapter 5‘s engagement strategies via formative checks and feedback loops. Assessment also advances Chapter 4‘s UDL commitments by offering multiple ways to demonstrate learning and by delivering accessible, actionable feedback.
6.2.2.5 Empowering Learners
The Empowering Learners pillar focuses on creating conditions where all students can participate, make meaningful choices, and build independence. It includes accessibility and inclusion (5.1), differentiation and personalization (5.2), and active learner engagement (5.3). In practice, accessibility and inclusion establish the baseline for participation. Differentiation offers flexible routes to consistent learning outcomes without lowering expectations. Active engagement transforms those routes into purposeful activity through clear roles, interaction structures, and visible progress markers. This pillar connects directly to the self-regulated learning competency in Teaching and Learning, as you can foster student agency by providing appropriate guidance, having your students monitor their own progress, and tasking them with making decisions about their learning strategies.
You can use AI to produce transcripts, captions, alt text, reading guides, and translations; you can also utilize AI to convert formats so materials meet diverse learner needs. For differentiation and personalization, use AI to vary examples and scaffolds, generate choice boards that align with a single rubric, and provide just-in-time hints that redirect learners to goals and criteria. For active engagement, use AI to seed discussion prompts, propose student roles for group work, summarize discussion threads to maintain momentum, and offer metacognitive nudges that encourage planning and reflection. Keep essential safeguards in view: Disclose AI use, protect student data privacy, avoid automated decisions that affect grades, monitor for algorithmic bias, and ensure that AI-enabled features remain optional or include accessible alternatives.
Empowering Learners advances Chapter 4‘s UDL by offering multiple means of engagement and representation, realizes Chapter 5‘s online engagement strategies through structured interaction and timely prompts, maintains alignment with Chapter 2 by providing flexible paths to the same objectives and rubric, and supports Chapter 3‘s RSI by making facilitation and feedback visible and accessible. It also prepares the foundation for the final pillar, where students’ own digital competence becomes an explicit learning outcome.
6.2.2.6 Facilitating Learners’ Digital Competence
The final pillar makes students’ digital competence an explicit learning outcome. It brings together five competencies–information and media literacy (6.1), digital communication (6.2), digital content creation (6.3), responsible use (6.4), and problem solving (6.5)–and treats them as skills students actively practice in online learning. This pillar asks you to design learning experiences that help your students question information sources, participate in productive online discourse, create and share original work with integrity, use technologies safely, and choose tools strategically to meet learning goals.
Information and media literacy necessitate AI literacy. Students must learn to interrogate search results and model outputs, trace claims to primary sources, compare multiple perspectives, identify bias, and document which tools they used and why. Digital communication connects to the collaborative learning competency from the Teaching and Learning pillar. Explicit norms for tone, citation practices, multilingual accessibility, and respectful disagreement help groups build knowledge rather than simply exchange opinions.
Digital content creation aligns with active learner engagement from the Empowering Learners pillar. Students produce artifacts that demonstrate learning outcomes while documenting their creation processes. When AI assistance is permitted, students disclose prompts used, version histories, and the scope of AI involvement, while properly crediting sources and licenses. Students practice privacy by design, minimize sharing of personal data, avoid automated decisions that could influence grades, and follow clear course policies on permitted or prohibited AI use. When AI assistance is not allowed, assessment design makes human work visible through draft submissions, documented rationale, and applied evidence tied to course materials.
Problem solving connects back to self-regulated learning from the Teaching and Learning pillar. Students plan their approaches, select appropriate tools, monitor progress against established criteria, and adapt strategies when encountering obstacles. Authentic tasks support this development: real data sets, community-based projects, case studies, and reflective analyses that require judgment rather than simple reproduction.
This pillar realizes Chapter 5′s engagement strategies by providing students with purposeful digital work, maintains alignment with Chapter 2 by mapping learning artifacts to outcomes and rubrics, upholds Chapter 4‘s UDL commitments through multiple means of action and expression, and makes Chapter 3‘s RSI standards visible when guidance, feedback, and expectations for technology and AI use are stated clearly and modeled consistently.
6.3 TPACK
TPACK complements DigCompEdu by explaining the knowledge base that underpins competent digital practice. While DigCompEdu describes what educators do across six pillars, TPACK helps explain why specific choices work by aligning Content Knowledge (CK), Pedagogical Knowledge (PK), and Technology Knowledge (TK) within particular contexts (Mishra & Koehler, 2006; Koehler & Mishra, 2009; Redecker & Punie, 2017). Used together, these frameworks transform competency statements into design decisions that remain faithful to the discipline, sound in pedagogy, and realistic with available tools.
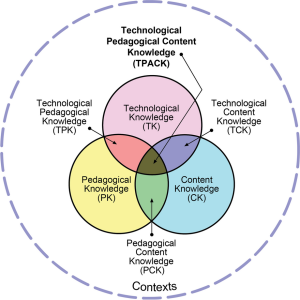
Figure 6.1 TPACK Framework
In TPACK, CK anchors disciplinary aims and standards, PK guides instructional strategies and assessment approaches, and TK addresses what tools can and cannot do, including their constraints for accessibility, privacy, and data use. The intersections between these knowledge domains prove essential for effective teaching: Pedagogical Content Knowledge (PCK) asks how to teach specific content well; Technology Pedagogical Knowledge (TPK) examines how technology reshapes teaching practices; Technology Content Knowledge (TCK) considers how technology represents or transforms content; and TPACK represents the coherent integration of all three knowledge types.
These intersections align clearly with DigCompEdu pillars. CK informs resource selection in Digital Resources and task design in Teaching and Learning. PK becomes visible in guidance strategies, collaborative structures, and self-regulation support within Teaching and Learning and Empowering Learners. TK runs throughout Professional Engagement and Digital Resources, while integrated TPACK judgment appears most clearly in Assessment when evidence collection matches both learning outcomes and tool capabilities.
AI integration makes these connections concrete. When considering AI-supported activities, educators should verify alignment with content goals (TCK), intended teaching strategies (TPK), and learners’ needs and constraints (PK and UDL principles). For instance, using AI assistants to suggest feedback on lab reports can accelerate formative response, but only when criteria remain disciplinary, students disclose AI assistance, and privacy protections stay intact. In writing-intensive courses, AI prompt design can support invention and revision processes, but rubrics must continue rewarding original analysis and documented thinking processes. TPACK provides the alignment check; DigCompEdu supplies the developmental pathway and daily practices that keep AI use transparent, ethical, and effective.
Apply this lens briefly and reflectively. TPACK works best as a qualitative alignment check rather than a formal assessment instrument, since measuring across its components can become unclear in practice (Voogt et al., 2012). A simple reflection prompt after each design decision can suffice: Does this activity maintain coherence across CK, PK, and TK while meeting the learning outcomes and RSI and UDL commitments established in earlier chapters? Used this way, TPACK connects to Chapter 2‘s alignment principles, operationalizes Chapter 5‘s engagement and feedback strategies, supports Chapter 4‘s inclusive design choices, and helps make Chapter 3‘s RSI requirements visible in daily practice.
6.4 Continuous Improvement
Quality teaching, like course design, is iterative. As technologies evolve and contexts shift, effective educators continuously design, observe, reflect, and refine their practice. The DigCompEdu pillars provide a durable framework for this ongoing work: you select and adapt resources thoughtfully, orchestrate learning and assessment with clarity, empower students through accessibility and agency, and make learners’ digital competence an explicit outcome AI belongs within this reflective, ethical practice that consistently serves learning outcomes.
Sustain this approach moving forward. Revisit your digital competency profile periodically, reflect on evidence from student learning, and adjust course design purposefully. Professional engagement through communication, collaboration, reflection, and ongoing learning maintains this improvement cycle and connects personal growth directly to student success. You now have the concepts, frameworks, and professional habits needed for effective practice. Apply them thoughtfully, learn from the results, and continue improving.
Reflection Questions
- What two strengths and one priority area appear in your SELFIE profile, and what is one change you will test next term to address that priority? What evidence will you collect to judge its effect?
- Choose one major activity or assignment. Check TPACK fit: How do content, pedagogy, and technology align? Decide whether AI is allowed, required, or prohibited, and specify rubric criteria, disclosure, and safeguards.
- How will you make your learners’ digital competence explicit in your course? Which Pillar 6 competencies will you assess, where will they appear in outcomes and rubrics, and what artifacts will you use to measure growth?
Key Takeaways
- Digital competency, framed by the DigCompEdu, is a core professional practice you can implement to produce quality online education.
- AI must be integrated through intentional, pedagogically grounded design aligned with learning objectives and accessibility principles while safeguarding privacy and academic integrity.
- Students’ digital competence must become an explicit and assessed learning outcome.
References
European Commission. (2022). SELFIE for teachers: A tool for teachers’ digital competence. Joint Research Centre. https://education.ec.europa.eu/selfie-for-teachers
Vuorikari, R., Kluzer, S., & Punie, Y. (2022). DigComp 2.2: The digital competence framework for citizens – With new examples of knowledge, skills and attitudes (Report No. JRC128040). Publications Office of the European Union. https://doi.org/10.2760/115376
Koehler, M. J. & Mishra, P. (2009). What is technological pedagogical content knowledge (TPACK)? Contemporary Issues in Technology and Teacher Education, 9(1), 60–70. http://dx.doi.org/10.1177/002205741319300303
Mishra, P. & Koehler, M. J. (2006). Technological pedagogical content knowledge: A framework for teacher knowledge. Teachers College Record, 108(6), 1017–1054. https://doi.org/10.1111/j.1467-9620.2006.00684.x
Redecker, C., & Punie, Y. (2017). European framework for the digital competence of educators: DigCompEdu (EUR 28775 EN). Publications Office of the European Union. https://doi.org/10.2760/159770
Voogt, J., Fisser, P., Pareja Roblin, N., Tondeur, J., & van Braak, J. (2012). Technological pedagogical content knowledge: A review of the literature. Journal of Computer Assisted Learning, 29(2), 109–121. https://doi.org/10.1111/j.1365-2729.2012.00487.x