
10 Geometry and Measurement

Geometry is a branch of mathematics that studies the sizes, shapes, positions, and dimensions of things. “Geometric and spatial thinking are important in and of themselves, because they connect mathematics and the physical world… and because they support the development of number and arithmetic concepts and skills” (Progressions for the Common Core State Standards in Mathematics, 2013). The Progressions document goes on to say,
“learning geometry cannot progress in the same way as learning number, where the size of the numbers is gradually increased and new kinds of numbers are considered later. In learning about shapes, it is important to vary the examples in many ways so that students do not learn limited concepts that they must later unlearn. From Kindergarten on, students experience all of the properties of shapes that they will study in Grades K–7, recognizing and working with these properties in increasingly sophisticated ways. The Standards describe particular aspects on which students at that grade level work systematically, deeply, and extensively, building on related experiences in previous years” (Progressions for the Common Core State Standards in Mathematics, 2013).
Former NCTM President J. Michael Shaughnessy said, “If algebra is the language of mathematics, geometry is the glue that connects it” (Shaughnessy, 2011). Additionally, geometry “covers the skills and concepts of visualization, spatial reasoning and representation, and analyzing characteristics and properties of two- and three-dimensional shapes and their relationships” (Lappan, 1999). In the Kansas Mathematics Standards, geometry spans every grade level from kindergarten to grade eight; it first begins with spatial sense, an intuition about shapes and the relationships between them including an ability to recognize, visualize, represent, and transform geometric shapes.
Van Hiele Levels for Teaching Geometry
The development of geometric thinking comes from Pierre van Hiele and Dina van Hiele-Geldof. The van Hieles identified five levels of geometric thinking through which students pass. Most elementary students are at levels 0 or 1 and some middle school students are at level 2. The levels are developmental – children of any age begin at level 0 and progress to the next level through experiences with geometric ideas (Van de Walle, Karp, Bay-Williams, 2019).
Level 0: Visualization
Students begin by recognizing shapes by their whole appearance, but not exact properties. For example, students see a door as a rectangle or a clown’s hat as a triangle, but may not be able to recognize the shape if it is rotated. The emphasis at Level 0 is on shapes that students can observe, feel, build/compose, or take apart/decompose. The goal of Level 0 is to explore how shapes are alike and how they are different and use these ideas to create classes of shapes (Van de Walle, Karp, Bay-Williams, 2019).
Level 1: Analysis
At this level, students start to learn and identify parts of figures and can describe a shape’s properties. Additionally, students at this level understand that shapes in one group have the same properties. For example, students know that parallelograms have opposite sides that are parallel and can talk about the properties of all parallelograms, not just this one. Students at Level 1 use physical models and drawing of shapes and use the properties of shapes such as symmetry, classification, and congruent sides and angles.
Level 2: Informal Deduction/Abstraction
Students at Level 2 start to recognize the relationship between properties of shapes and develop relationships between these properties. Students will consider if-then reasoning, such as “If all four angles are right angles, the shape must be a rectangle. If it is a square, all angles are right angles. If it is a square, then it must be a rectangle.” Level 2 includes informal logical reasoning and should be encouraged to ask “Why?” or “What if?” Additionally, Level 2 tasks emphasize logical reasoning.
Level 3: Formal Deduction
At this level, students analyze informal arguments and are capable of more complex geometric concepts. A student at this level is usually in high school.
Level 4: Rigor
The last level of geometric reasoning is the ability to compare geometric results in different axiomatic systems; they see geometry in the abstract. A student at this level is usually a college mathematics major.
Read this short article from NRICH for some activities required at each of the levels of geometric thinking.
In order to support students as they move from a Level 0 to a Level 1, teachers should focus on the following:
- Focus on the properties of shapes rather than the identification of those shapes,
- Challenge students to test their ideas about shapes using a variety of examples, and
- Provide multiple opportunities for students to draw, build, make, compose, and decompose shapes.
Shapes and their Properties
Students should first focus on the location and position of shapes in order to develop a variety of skills that will contribute to their spatial thinking. In kindergarten, students are expected to describe the position of shapes in the environment using the terms above, below, beside, in front of, behind, and next to. Additionally, students develop spatial sense by connecting geometric shapes to their everyday lives and shapes in their environment.
Students must have experience with a variety of two- and three-dimensional shapes. Additionally, triangles should be shown in several forms and not always with the vertex at the top or the base horizontal with the bottom of the paper (Van de Walle, Karp, & Bay-Williams, 2019).
Kindergarten students learn to describe shapes by their attributes and should be given multiple opportunities to build physical models. When students build and manipulate shapes, they can learn to explore and describe the number of sides and corners (vertices). Ask students to describe shapes by the properties, such as “squares have four sides of equal length.”
Two-dimensional shapes
It is in kindergarten that students learn to distinguish between two- and three-dimensional shapes. Two-dimensional shapes are flat and can be measured in only two ways such as length and width. Examples of two-dimensional shapes are squares, circles, triangles, etc.
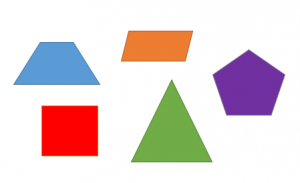
Classifying shapes begins in kindergarten. And when students sort and classify polygons, they should determine the groupings, not the teacher. In second grade, students focus on triangles, quadrilaterals, pentagons, and hexagons. Third grade students think about the subcategories of quadrilaterals, and by fifth grade, they “understand the attributes belonging to a category of two-dimensional figures also belong to all subcategories of that category.” For example, a square is a rectangle and a square is also a rhombus.
Triangles
Types of triangles are first introduced in fourth grade with the beginning concept of right triangles. A right triangle is a triangle with one 90o angle. Other types of triangles are acute triangles and obtuse triangles.
Triangles can also be classified by their sides: equilateral triangle, isosceles triangle, and scalene triangle. An equilateral triangle is a triangle in which all sides are the same length. An isosceles triangle has at least two sides of the triangle the same length. And a scalene triangle has no sides that are the same length.
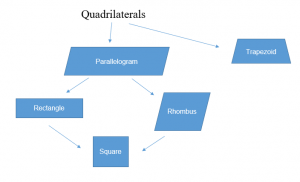
Quadrilaterals
Quadrilaterals are polygons with four sides. The general types of quadrilaterals are parallelograms, rhombi, rectangles, squares, and trapezoids. There is a hierarchy of quadrilaterals, as shown below.
Composing and Decomposing
Students need multiple opportunities to explore how shapes fit together to form larger shapes (compose) and how larger shapes can be made of smaller shapes (decompose). In kindergarten, students move beyond identifying and classifying shapes to creating new shapes using two or more shapes. This concept is foundational to students’ development of translation (move or slide), rotation, and reflection (flip).
In first grade, students compose and decompose plane figures and determine which attributes are defining and non-defining. Defining attributes are those properties that help to define a shape, such as the number of angles, number of sides, length of sides, etc. Non-defining attributes are properties that do not define a shape such as color, location, position, etc. An example is a square. All squares must be closed figures and have 4 equal sides and all angles 90o; these are defining attributes. Squares can be different colors and be turned in a different direction; these are non-defining attributes.
Example:
Which of the following is a square? And how do you know?
- A square has 4 sides.
- All four sides are the same length.
- All angles are 90o.
- Therefore, the red figure is a square.
Be sure to give students many opportunities with a variety of manipulatives to explore and build shapes. These manipulatives could be paper shapes, pattern blocks, color tiles, tangrams, or geoboards with colored rubber bands (or you can use virtual geoboards).
When students are composing and decomposing both plane and solid figures, they are also building an understanding of part-whole relationships and compose and decompose numbers. Furthermore, it is in first grade that students partition regions. Students need multiple opportunities to use the words halves, fourths, and quarters, which is critical to understanding fractions. In second grade, students work with halves, thirds, fourths; and teachers will help students make the connections that a whole is two halves, three thirds, or four fourths.
In third grade, students partition shapes into equal portions. For example, partition a square into four equal parts.

Each of the above squares are partitioned into fourths, and each part has the same area.
Three-dimensional shapes
Kindergarten students learned to distinguish between two- and three-dimensional shapes. Three-dimensional shapes have three dimensions, such as height, width, and depth. Examples of three-dimensional shapes are cubes, prisms, rectangular prisms, pyramids, etc. Additionally, it is important to note that the faces of three-dimensional shapes can be named as specific two-dimensional shapes. Give students multiple opportunities to work with pictorial representations, concrete objects, and technology as they develop their understanding of both two- and three-dimensional shapes.
Measurement is the “assignment of a numerical value to an attribute of an object” (NCTM, 2000). Measurement is a critical concept in mathematics because of the connection to everyday life. Additionally, there are connections to other mathematics, as well as other content areas.
In kindergarten through grade 2, students compare and order objects using the terms longer and shorter. Length is the focus in this grade band, although students also explore weight, time, area, and volume. In the 3-5 grade band, students continue to explore area, perimeter, volume, temperature, and angle measurements.
Additionally, students in grades 1-3 learn to read a clock (analog and digital); in first grade, they tell time to the nearest hour and half hour, in second grade, to the nearest 5 minutes, and in third grade, to the nearest minute. In third grade, students solve problems involving elapsed time. In second grade, students learn about dollars and cents and know all coins and bills by their value.
Reading a Clock
Time can be a difficult subject to teach because it can not be seen or manipulated. Additionally, time is difficult to comprehend for most students because the duration of time depends on what the student is waiting for. Teachers should give students opportunities to time events in their everyday lives, such as brushing their teeth, eating lunch, riding the bus to school, etc.
Benchmarks are critical for learning to tell time. Students need to know that there are 60 minutes in one hour, and that 57 minutes is close to 60. In first grade, limit times to the hour and half-hour.
The Kansas First Grade Flipbook (2017) gives these ideas to support telling time:
- Within a day, the hour hand goes around a clock twice (the hand only moves in one direction)
- When the hour hand points exactly to a number, the time is exactly on the hour
- Time on the hour, i.e., 9:00, is written in the same manner as it appears on a digital clock
- The hour hand moves as time passes, so when it is half way between two numbers it is at the half hour
- There are 60 minutes in one hour; so halfway between an hour, 30 minutes has passed
- Half hour is written with “30” after the colon.
Source: Kansas First Grade Flipbook, 2017
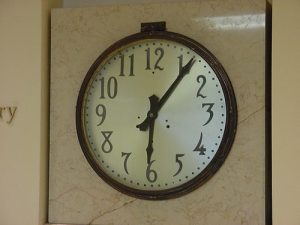
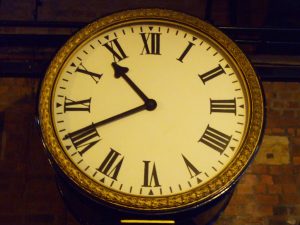
Students need to explore the analog clock. The short hand indicates the approximate time to the nearest hour. The long hand shows minutes before and after the hour. Also notice the clock below; the time is 10:42. It is ten o’clock, even though the short hand is close to eleven. This is confusing for children; one way to talk about this is that the short hand is in the one space. It is not quite eleven o’clock.
Students can connect the idea of a number line to the clock. The number line has been formed into a circle. Another idea is that of the one-handed clock (Van de Walle, Karp, & Bay-Williams, 2019). A one-handed clock helps students focus on the hour hand since the hour hand gives the most information about time. You can purchase an inexpensive clock, set it to the correct time, and remove the minute hand, or you can print a blank clock face and draw in the hour hand. Either way, make sure that the hour hand is in the correct place for a quarter past the hour, a quarter until the hour, half past the hour, and some times that are close to but not on the hour.
Click here for an interactive online analog and digital clock.
Second grade students learn to tell time to the nearest five minutes. There is a good connection here to skip counting by fives. And in third grade, students learn to tell time to the nearest minute, using a.m. and p.m.
Elapsed Time
Solving problems with elapsed time is expected in third grade. Students should use the counting on approach in order to provide a solid foundation. For example, “How much time has elapsed between 8:15 a.m. and 11:45 a.m.?” Students could count on from 8:15 to 11:45 (3 hours) and then 15 minutes to 45 minutes is 30 minutes. So the elapsed time is 3 hours 30 minutes. Or students could draw an open number line.
Money
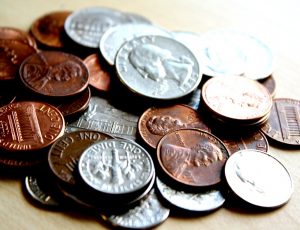
Students will begin working with money in second grade and solve word problems involving dollars or cents. Second graders have not been introduced to decimals; therefore, ask students to solve problems involving dollars or cents, but not a combination of the two. They will learn about dollars that include $1, $5, $10, $20, $100 bills, and coins that include quarters, dimes, nickels, and pennies. In addition, they should learn to use the $ and ¢ symbols.
Learning the value of each coin can be confusing for young students because the size of the coin doesn’t represent the value. For example, think of a dime and a nickel. The dime’s value is 10¢ whereas the nickel’s value is 5¢, but the nickel is a bigger coin. Therefore, students need to learn the value of each coin by being told, just as they learn the names of other physical objects.
Counting money connects to skip counting by 5s, 10s, and 25s. In addition, introduce “start and stop” counting. This is where students may begin counting by 10s. After several students have counted, tell them to stop and then count by 5s. For example, ask students to count up to 50 by tens (10, 20, 30, 40, 50), then stop and count by fives (55, 60, 65, 70).
Give students multiple opportunities to identify, count, recognize, and use dollar bills and coins. They should also be given the experiences of making equivalent amounts, such as “What are all the possible combinations of coins that equal 47¢?” or “What are all the possible combinations of dollar bills that are equal to 16 dollars?”
Check out this website for some activities involving money.
Length
There is a recommended sequence for teaching measurement. This begins in kindergarten by asking students to make comparisons of measurable attributes, such as longer, shorter, taller, heavier, lighter, etc. This is a critical step in the development of measurement. Give students many opportunities to compare directly so the attribute becomes the focus. Additionally, ask students to discuss and justify their answers to questions such as, “Which box will hold the most?” “Which box will hold the least?” “Will they hold the same amount?” “How could you find out?” Provide students with many items to choose from in order to support their thinking, such as dried beans.
Students then continue by using models of measuring units that produce a number called a measure. In kindergarten, start with nonstandard units. For example, ask students, “How many snap cubes tall is the can?” or “How many footprints is the length of this room?” A part of the developmental process in the understanding of measurement is the opportunity to measure.
Students should be given opportunities to make or use their own measuring tools, such as paperclips, or a handprint. After students become proficient in making comparisons and measuring with nonstandard units, you can introduce common measuring tools, such as a ruler.
When students make direct comparisons for length, they must notice the starting point of each object and be aware that the objects must be matched up at the end of the object. A developmental milestone for kindergarten students is conservation of length which refers to the recognition that moving an object does not change the length.
In first grade, students indirectly measure the length of two objects by using a third object, such as a measuring tool. This is transitivity and is connected to conservation. Be sure to use the language taller, shorter, longer, and higher. If students use the words bigger and smaller, ask them to explain what they mean.
When students are measuring an object, they are deciding how many units are needed to fill, cover, or match the object being measured. Ask students to first predict the measurement, then find the measurement, and then discuss the estimates. Additionally, ask students to measure objects that are longer than their measuring tool. This will lead to some good discussions and collaborations among students.
When you ask students to use multiple copies of one object to measure a larger object, this is called iteration. Through careful questioning from the teacher, students will recognize the importance of no gaps and overlaps to get a correct measurement.
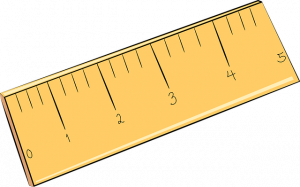
As students transition from using nonstandard units to standard units to measure, they must be taught to use a ruler correctly when measuring the length of an object. It is critical that students locate the starting point on the ruler. Notice on the ruler below that zero is not at the end.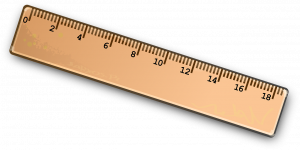
You can ask students questions such as, “Do you start at the end of the ruler, or at zero?” and “Why do we start at zero?” and “Are we looking at the spaces or the tic marks?” Students need to understand that the spaces indicate the length of the object; the tic marks indicate the end of the space.
Students also need multiple experiences with measuring in inches, feet, centimeters, and meters. Students should measure a length twice and compare the two measurements. For example, the length of the desk is 36 inches or 3 feet; or the length of a paperclip is 3 centimeters or 30 millimeters.
Students should also be expected to estimate lengths using whole units before they measure. Additionally, students should find their own personal benchmark measurements, such as the width of one of their fingers is a centimeter, or the length between their elbow and wrist is a foot.
Mass and Volume
Beginning in third grade, students will reason about mass and volume. Students first measure and estimate the liquid volume and masses of objects using grams, kilograms, and liters. Students need multiple opportunities to weigh objects so they have a basic understanding of the size of weight of a liter, gram, and kilogram. Additionally, students need time to weigh objects and fill containers in order to develop a conceptual understanding of size and weight.

You and your students will find geometry and measurement in almost everything. Studying geometry makes us more aware of the world in which we live and how things are constructed. Geometry should be experienced by children each year from preschool through grade 12. Young children are aware of of spatial relationships and introducing them to geometry helps them realize that mathematics plays an important role in the world in which we live (Egsgard, 1969). Additionally, “geometric reasoning plays a critical role in the development of problem-solving skills, mathematical learning, and reading comprehension” (Schroeter, 2017).
an intuition about shapes and the relationships between them
a triangle with one 90 degree angle
a triangle with all angles measuring less than 90 degrees
a triangle with one angle that measures more than 90 degrees
a triangle in which all sides are the same length
at least two sides of the triangle the same length
no sides that are the same length
opposite sides parallel and opposite sides are the same length
a parallelogram with all sides equal
a quadrilateral with opposite sides parallel and equal length and all angles right angles
a quadrilateral with opposite sides parallel and all 4 sides equal length and all angles right angles
a quadrilateral with opposite sides parallel. The sides that are parallel are called “bases” and the other sides are “legs.” Trapezoids are also called trapeziums.
attributes that must always be present in order to create that shape
attributes that do not always have to be present in order to create the shape
a three-dimensional solid that has six congruent square faces.
a solid three-dimensional shape
with two identical, parallel polygon bases
a prism with two identical, rectangular bases
a solid three-dimensional shape with a polygon base and triangular faces that taper to a point, also called the vertex or apex.
to find a number that shows the size or amount of something
if an object is moved, its length does not change
the ability to indirectly measure objects by comparing the length of two objects by using a third object
use multiple copies of one object to measure a larger object
a measure of how much matter is in an object
the amount of 3-dimensional space something takes up, or the capacity
